How to Level Your Ender-3 V2's Print Bed
 Updated
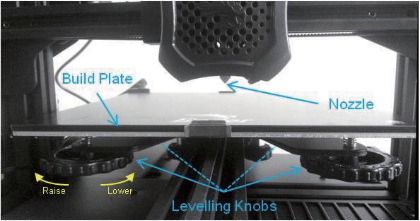
The first and most important step to ensure the success of 3D printing is to ensure that the build plate is parallel to the plane in which the nozzle of the extruder travels keeping the distance to the Build plate constant. This is also called "leveling" in 3D printing. There are four leveling points, one near each corner of the bed, Each uses a screw and a leveling knob to compress a spring supporting the build plate. Turning the knob on the screw compresses or decompresses the spring which supports the build plate. The directions are marked on the knobs with up and down arrows.
To level your build plate for the first time, please follow the instructions below:
- First, remove the glass from the bed of the printer, prise the 2 securing clips away from the edge of the bed and remove the glass plate.
- Peel the protective film off the glass plate, make sure it is clean on both sides and that the surface of the aluminum bed is also clean.
- Tighten the leveling knobs (anti-clockwise) to compress the springs and lower the build plate, if the knob is too slack the screw may just turn in place rather than compressing the spring. If so hold the screw thread in place while tightening the knob until it stays in place by itself. Lower it evenly as far as it will go but be careful that the bottom of the build plate stays clear of the ends of the Y axis drive belt which stick up underneath it.
- Refit the glass plate, it has a smooth side and a textured side, lay it smooth side down on top of the aluminum bed, make sure it is square and attach it using the clips, one in the front center and one in the back center. Turn on the printer and from the menus go to the Prepare menu, highlight Auto Home and Tap to select. The printer will now go through a homing sequence which moves the nozzle to the front left corner in it's lowest position.
The leveling points are about 30mm in from each corner. There is no need to measure exactly.
Take a thin sheet of paper (Standard A4 printer paper works well) and place it on the build plate and underneath the nozzle.
To move the nozzle around you can either move it by hand, this is easy on the Y axis just slowly slide the build plate forwards and backwards. To move the X axis either slide the nozzle slowly across the Y axis by hand or both can be moved by using the Printer itself. If moving the axes by hand before you do so on the prepare menu select Disable Stepper motors to prevent the stepper motors from trying to hold their position or acting as generators feeding unwanted current back into the Printer control board. When moving the X axis be careful to only exert pressure in the horizontal direction, do not accidentally move the Z axis up or down. Moving the axis by printer motion controls is preferred, certainly for X axis movements, as it removes these risks.
To move an Axis using the printer controls; The coordinates for the 4 positions will be X/Y 30/30, 30/205, 205/205, 205/30
- From the main menu select Prepare / Move then select the Axis you want to move, in this case just X and Y so select Move X and Tap.
- It will show a position number highlighted for the selected axis, For X and Y 0 is at the home position, the numbers are measured away from home, to the right for X and to the back for Y.
- To change the position rotate the knob until the required position is shown and Tap to move the nozzle to that position.
- If needed to prevent the nozzle scraping over the bed move the Z axis up by 2mm before moving the Nozzle in the X and Y axes. But once in the desired XY position lower it back down to Zero.
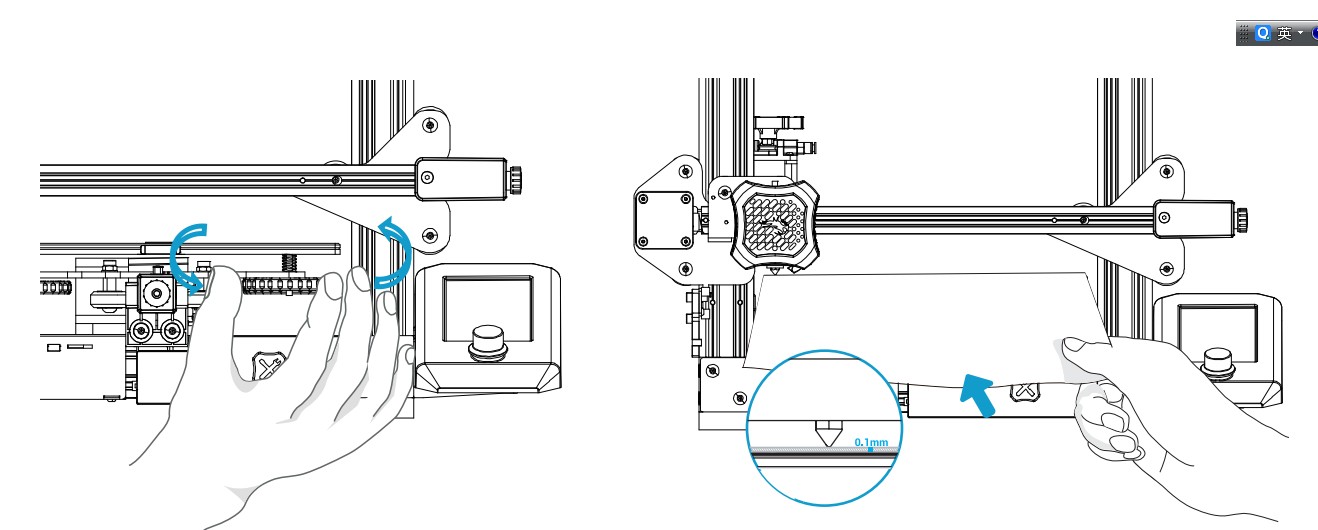
When the nozzle is in position jiggle the paper back and forth while adjusting the leveling knob to raise (or lower) the build plate until there is just the start of friction between the paper and the nozzle.
Repeat this for all 4 corner positions. As the level position of each corner can slightly affect the others for the first time leveling the bed it is suggested that you go through the complete process a second time starting with redoing the auto home commend.
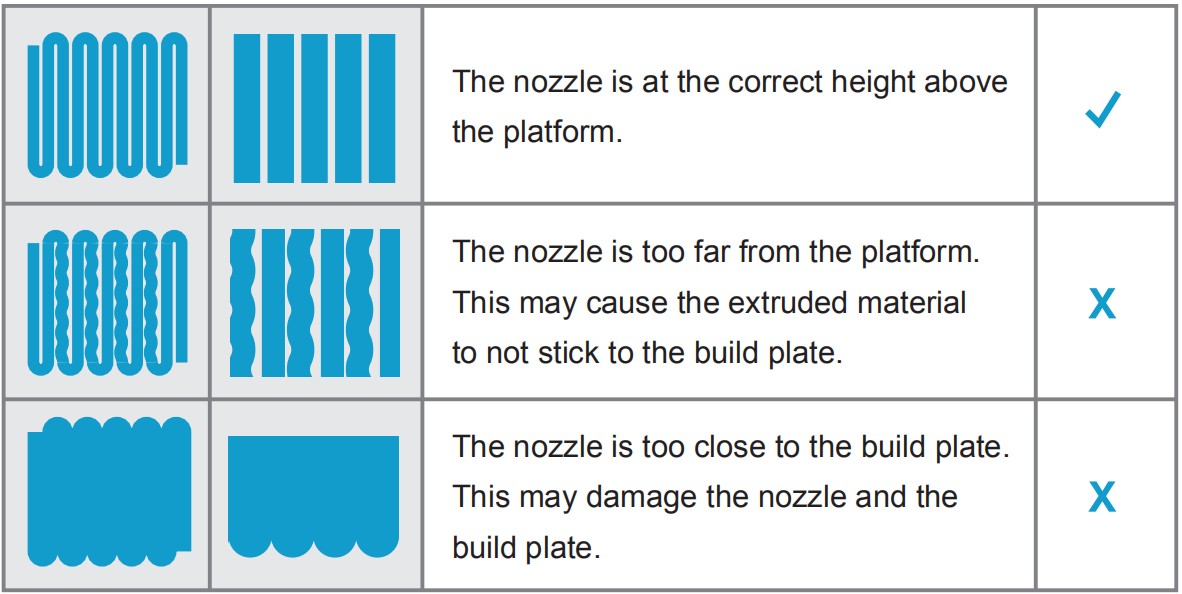
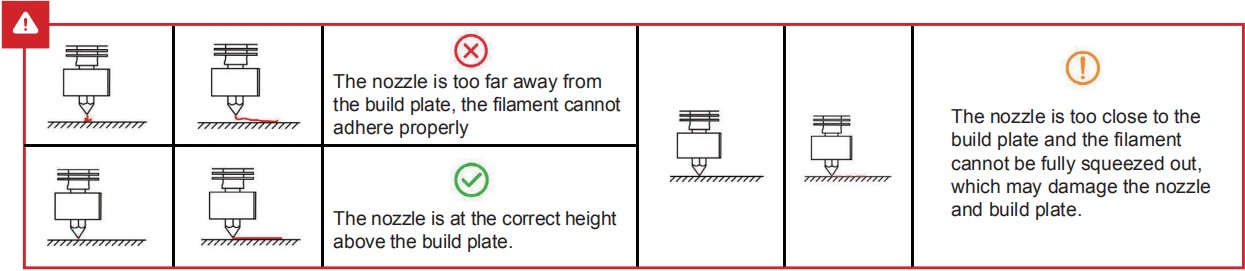
What a Successful First Layer should look like