Easel Software Instruction Guide for Genmitsu CNC Router

Genmitsu CNC Router – Easel Software Instruction Guide
Easel is a free, browser-based CNC design and control software, compatible with GRBL-based machines such as the Cubiko CNC Router. Follow this guide to connect your Genmitsu CNC routers to Easel and run your first carving project.
Step 1: Preparations
- Assemble and Check Your Genmitsu CNC Routers
- Verify the machine is assembled according to the manual.
- Ensure all cables (motors, limit switches if installed) are securely connected.
- Confirm the spindle is mounted correctly and the bit is tightly fastened.
- Connect the CNC to your computer with the USB cable.
- Switch on the power supply.
- Set Up Easel
- Go to 👉 https://easel.com
- Sign up for an account, or log in if you already have one.
- If prompted, install the Easel Driver (required for browser-to-CNC communication).
- (Optional) Install Driver
- If your Genmitsu CNC routers is not recognized, download and install the CH341 USB driver.
Installing the CH341SER driver will allow your computer to recognize the CNC controller board as a serial device, which can then be used with Candle or other CNC control software.- CH341SER Driver (For Windows): If windows does not do so automatically when you connect your CNC to the computer for the first time, this downloadable file is the Driver which is needed for your computer to be able to communicate with your CNC.
- CH341SER Driver (For Mac): This driver will not install automatically and must be installed as dictated by instructions included in the .zip which this link will download.
- CH341 Installation Guide: Although this guide is about CH340, it also applies to CH341. CH341 is a newer version of the CH340 and has some added features. CH341 supports I2C, SPI, and 8-bit parallel bus interfaces, whereas CH340 only supports serial communication.
- After installation, reconnect the machine and check your COM port in Device Manager.
- If your Genmitsu CNC routers is not recognized, download and install the CH341 USB driver.
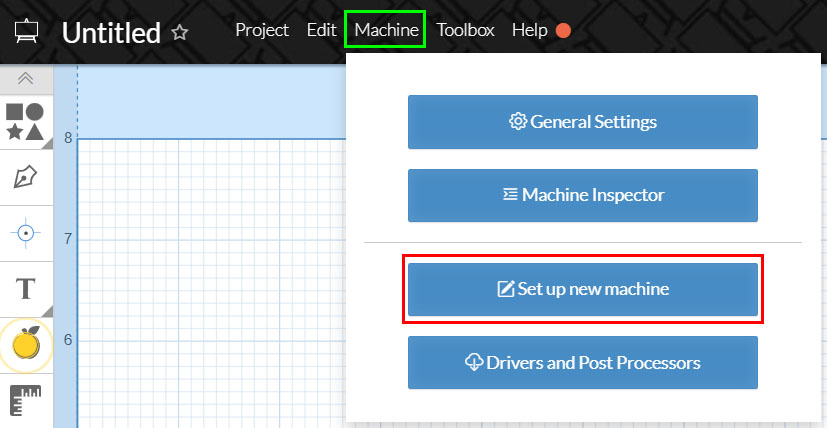
Step 2: Setting Up CNC in Easel
- Log in to Easel → Click the Machine tab (Green Box) and then select Set Up a New Machine (Red Box).
- Select Machine Type → Click Start Machine Setup and then on the next page scroll down Select Sainsmart
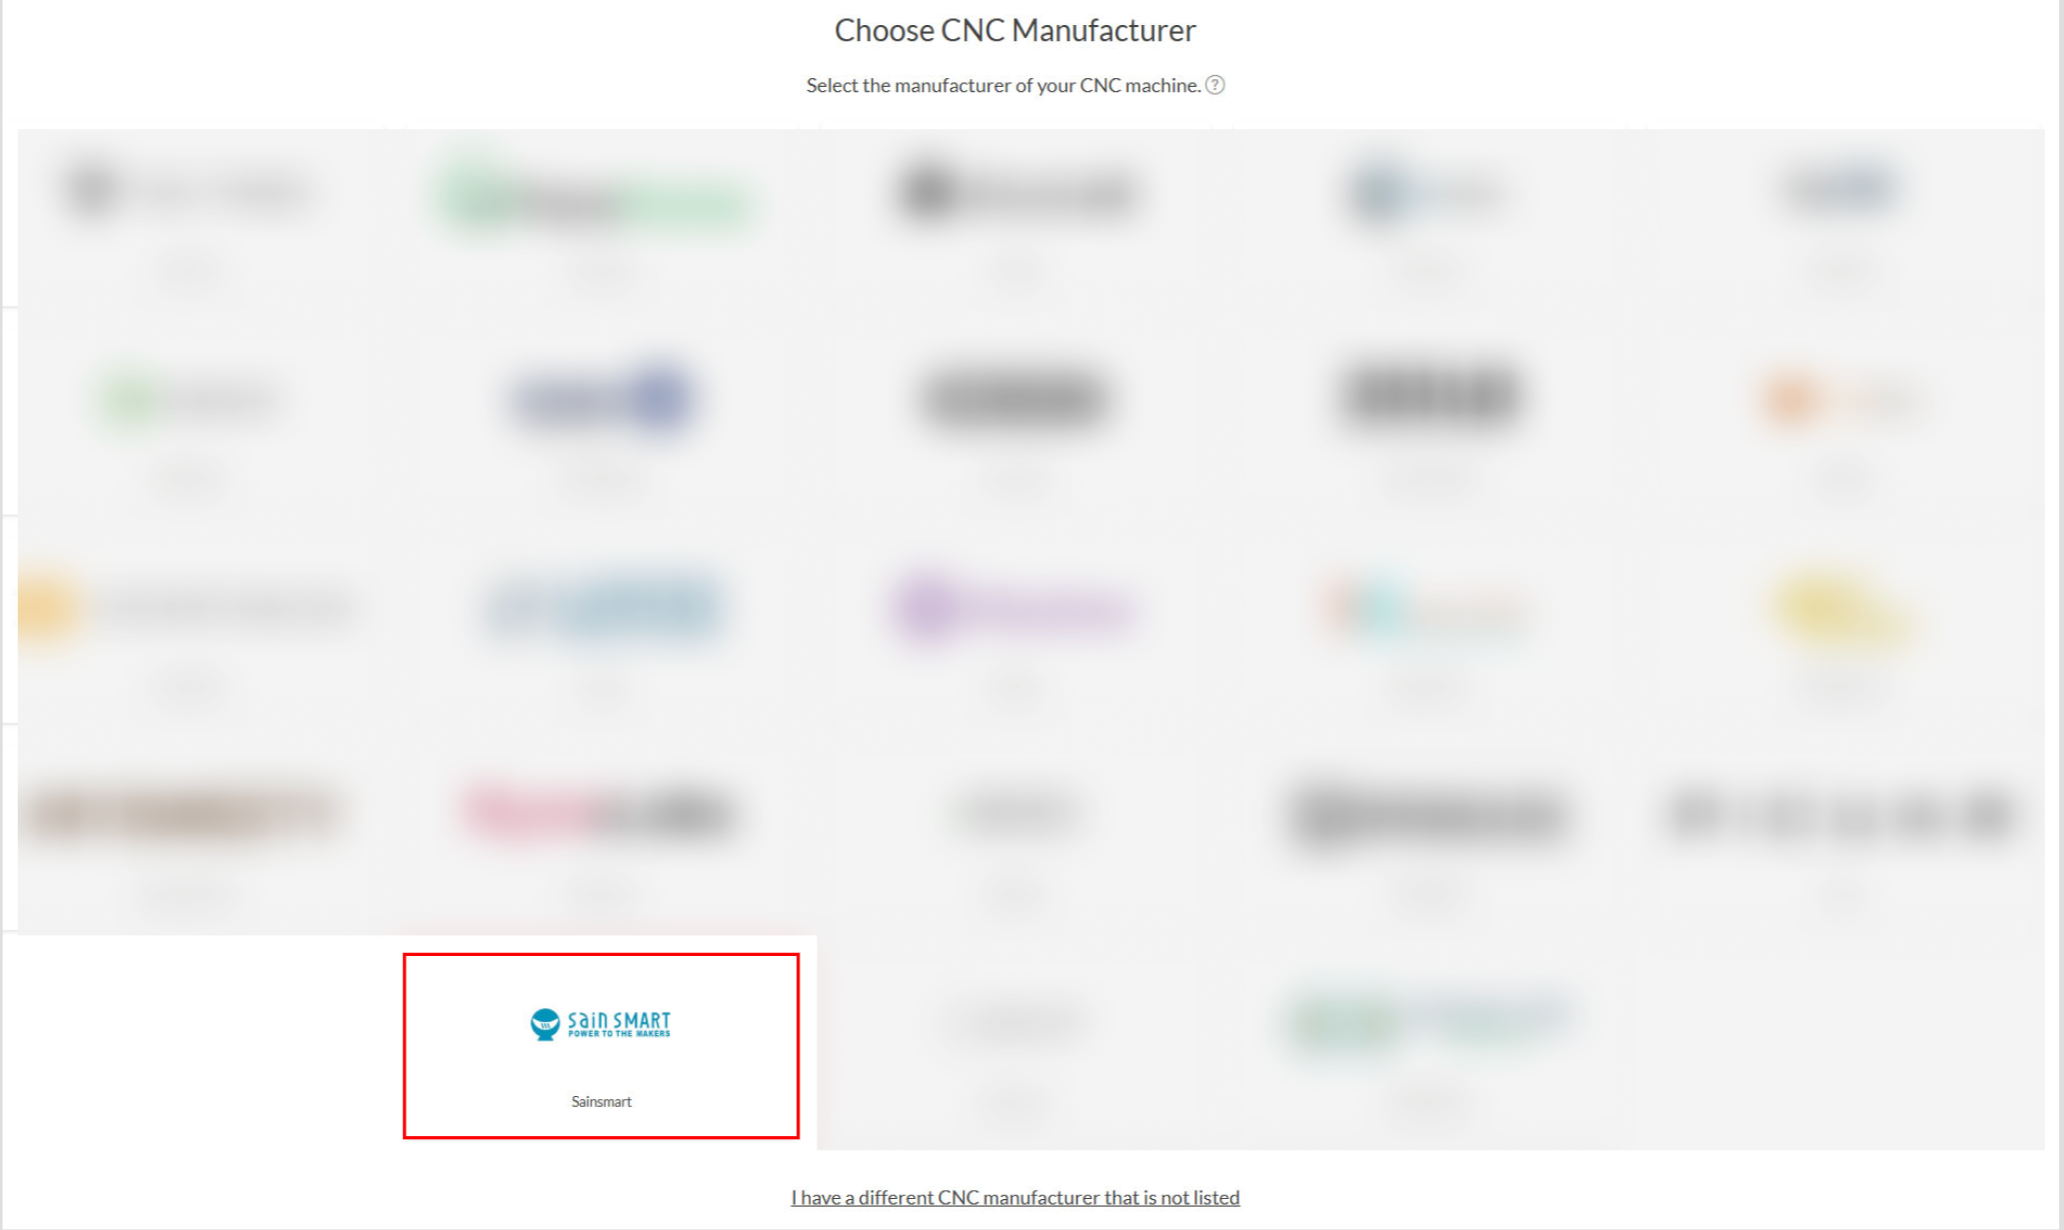
- On the next page, scroll down and select Other if your machine is not one of the listed options, as is the case for the Genmitsu CNC routers. If your machine is listed, you can skip from here to Step 3: Jogging Test. Just select the machine and confirm the selection on the next page, and you are good to go.
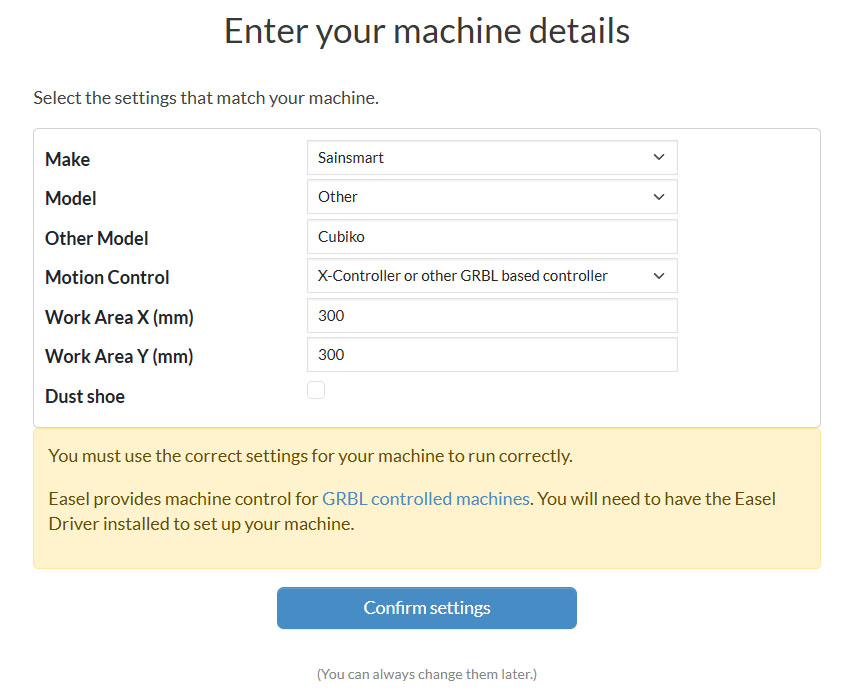
- Enter Machine's Specifications -> Enter the information as shown below for the Cubiko, but if you have a different unlisted machine, you will need to source these specifications for the CNC to work correctly
- Final Configuration -> Once you have made the machine profile, we will need to make some minor adjustments. To do so, again select the Machine Tab and click Edit your Machine. You will want to alter the Below based on what CNC you have:
- Spindle Controlled By -> This setting determines if your CNC spindle will be controlled by software or manually. Please set this to Hardware.
- Spindle -> Set this to Other.
- Default Spindle Speed (RPM) -> Set this to 10000.
- Click Save to complete the final configuration.
Step 3: Jogging Test
- Click the Carve button in Easel, found in the upper right-hand corner of the software. This window will appear:
Home your CNC first thing. You can do this either by pressing the button shaped like a house, or by clicking the blue Home button you can see towards the bottom-right. When you do this, the CNC will start moving. Do not be concerned, as this is the expected behavior.
- Use the Jog Controls to move X, Y, Z axes:
- Test X+ / X−, Y+ / Y−, Z Up / Z Down.
- Start with small step sizes (0.1–1 mm).
- Confirm movements are smooth and in the correct direction.
- If axes move in reverse, such as you press Z down and it moves upwards, please contact us at support@sainsmart.com
Step 4: Preparing to Engrave
With the movement of your CNC tested, we can now move to running an actual file. While staying on the same Carve screen from Step 3, you will want to:
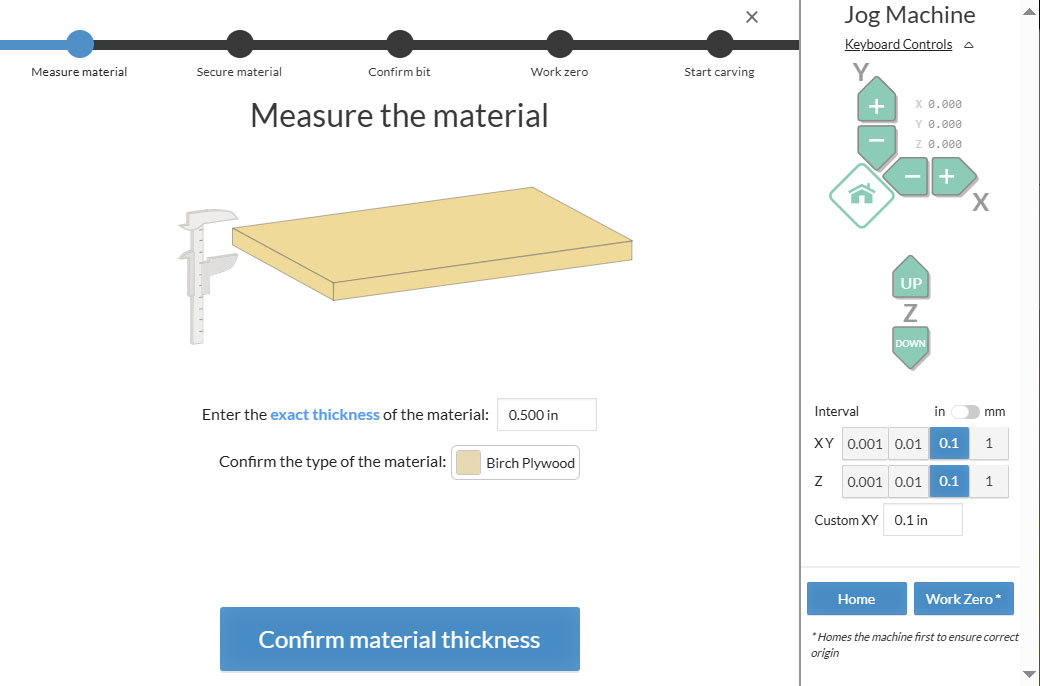
- Measure Material Thickness -> Use a calper or other means to measure the thickness of your material. You want this measurement to be as exact as possible to prevent damage to your CNC bed. Once measured, enter the value into the space the software gives you.
- Select Material Type -> From the drop-down menu, select the type of material you will be cutting. After doing so, you can click Confirm Material Thickness.
- Secure Material → Clamp your stock firmly to Genmitsu CNC router’s workbed. After doing so, confirm in the software that your work material is secured.
- Install Bit → Install the Bit/endmill into your CNC spindle as instructed to in the user manual, and then confirm in Easel which endmill you are using. If the correct one is not listed, you will need to exit this process and follow this guide to enter the Bit/endmill data into Easel, then restart the carve process. Click Confirm Bit Size once the correct endmill is selected in the software.
- Set XY Zero
- Jog the bit to the start position on the X and Y axes (commonly the bottom-left corner of your work piece) as shown in the Easel Illustration. Once the X and Y axes are in position, do not press anything and move onto Set Z Zero.
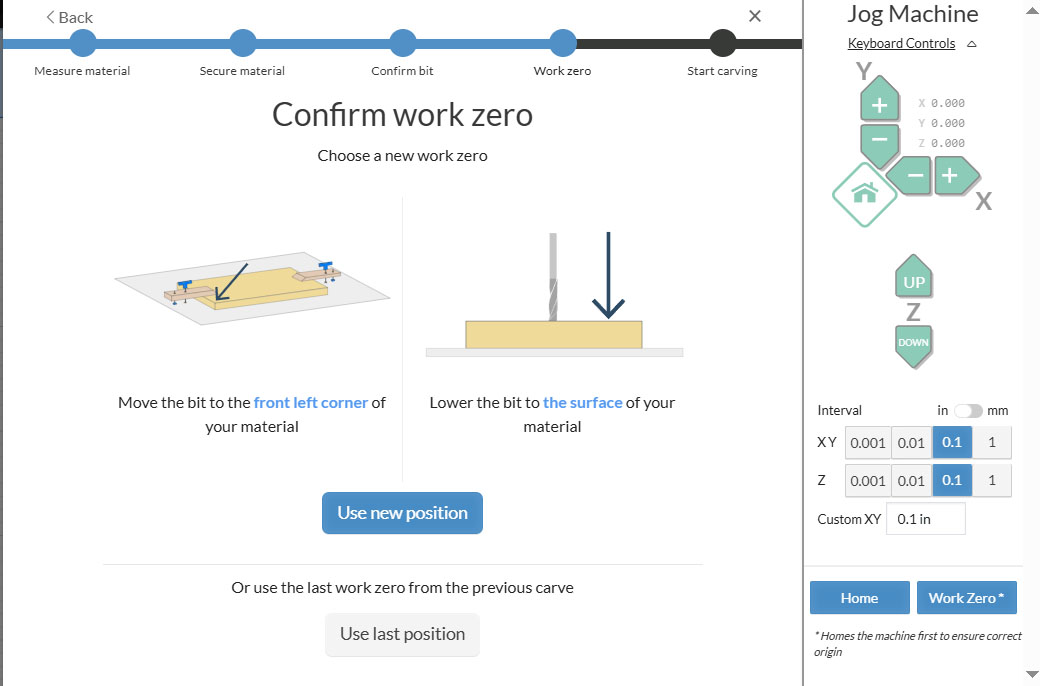
- Set Z Zero
- With your X and Y axes in position, and your bit securely installed, set your Z Jog Interval to 1 and start jogging downwards towards the surface of your material. Continue jogging downward until your bit is close to, but not yet touching, the material surface.
- Next, get a piece of paper, and set your Z Jog Interval back to .1 instead of 1. Place the piece of paper between the bit and your material, and start lowering the Z axis further until the piece of paper is pinched between the endmill and the material and cannot be moved. When you have achieved this, select Use New Position. Make sure your hands are clear of the bit from the endmill from this point onwards.
- Final Preparation -> In the next window, you will be asked to raise the bit. Do so using the jog controls to raise the Z axis upwards so that you can remove the piece of paper and have some space between the tip of your bit and the material. After doing so, select Raise the Bit and then confirm that the Spindle is On.
- Carve -> You are now ready to press Carve in this window, and your engraving will start.
Step 5: Running Your First Carve
- Design or Import
- Create shapes and text in Easel, or import SVG/G-code files.
- Set Material & Bit Parameters
- Select material type and bit size.
- Use conservative feeds and depths when starting out.
- Simulate Toolpaths
- Use Easel’s preview to check for errors or collisions.
- Final Safety Check
- Material secured, bit tightened, spindle raised, goggles on.
- Carve
- If manual spindle: switch it on first.
- Click Carve → Confirm → Start in Easel.
- Monitor machine closely during the job.
- Be ready to hit the Emergency Stop if anything goes wrong.
- After Carving
- Wait until spindle fully stops.
- Jog the bit clear of the workpiece.
- Remove your finished project.
Troubleshooting
- Connection issues → Check USB cable, Easel Driver, CH341 driver, or COM port conflicts.
- Poor carving quality → Use sharper bits, reduce feed rate, tighten machine parts.
- Axis direction reversed → Contact us at support@sainsmart.com
Next Steps
- Explore Easel’s design library.
- Experiment with Fusion 360 or VCarve for more advanced projects.
- Join the Genmitsu Facebook Community to share designs and get support.