Uploading Firmware on a SainSmart CNC Controller
 Updated
Based off of the work of Jim Kortge
The items you may need:
- SainSmart Genmitsu CNC Router 3018-PRO DIY Kit
- SainSmart Genmitsu CNC Router 3018-PROVer Kit
- Download the firmware for a 3018 PRO
- Download the firmware for a 3018 PROVer
Introduction
This document is a step by step set of directions for uploading new firmware to your SainSmart CNC controller, as well as a method to restore it to factory default settings.
Please note that it is strongly recommended that you only use firmware provided by SainSmart. While our machines are open source, the firmware that comes installed on your CNC is customized for specific features and ease of use, compared to the standard GRBL.
For users with Windows 7, the CH340 driver must have been installed for the controller to work. For Windows 10 users, this driver is installed the first time the controller is connected to the computer via a USB connection. Specific controllers tested include those marked as “Woodpecker GRBL 3.2A”, Woodpecker GRBL 3.3”, Camtool 20CNC-V3.3, and the unmarked PROVer controller.
Preparing for Installation
If you have a 3018 Pro:
1.Download the firmware for a 3018 PRO
2. Unzip this package and note the location of the directory created on your computer. The unzipped files include a .hex file for the 3018 Pro GRBL 1.1f firmware.
If you have a 3018 PROVer:
1.Download the firmware for a 3018 PROVer
2. Unzip this package and note the location of the directory created on your computer. The unzipped files include a .hex file for the PROVer GRBL 1.1f firmware
Installing the Firmware
1. Plug the controller into a Windows computer with a USB port. The USB port will supply voltage to the controller’s microprocessor, so ensure that the external power supply is disconnected or switched off.
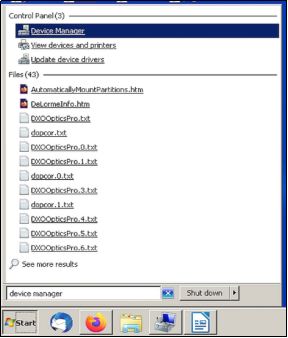
2. Find the Device Manager Application by typing “Device Manager” in the “Start” window for Windows 7. For Windows 10, type “Device Manager” in the Search Window. Start the Device Manager Application by left clicking on it.
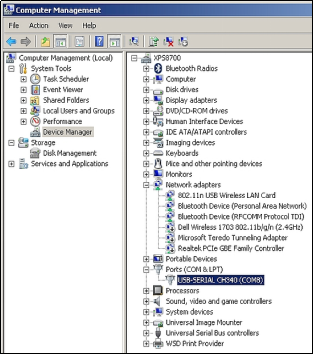
3. In Device Manager, look for the Ports (COM & LPT) entry and click on it to show the active driver being used. For all controllers, this should be CH340, but different COM port numbers may be shown. Write down the COM port number, as it will be needed later.
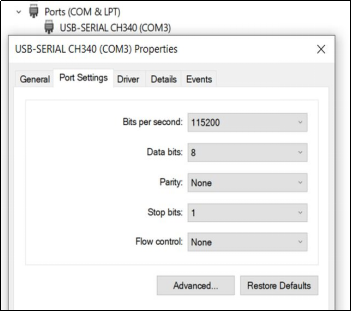
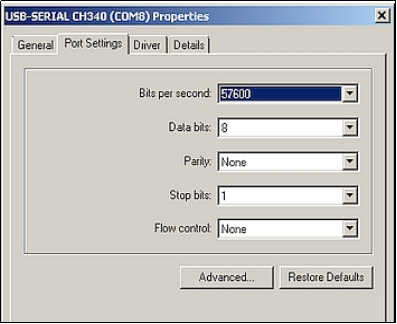
4. Click on the highlighted driver line to expand it. For this step, what you will see as you proceed will be dependent on whether your machine is a PROVer or a 3018 Pro. When expanded, it will show 4 tabs, click on the one named “Port Settings” and set it to 115200 Bits per second as shown for the PROVer. For the 3018 Pro controller, use a value of 57600. Then close the Device Manager Application by clicking in the upper left icon or Alt F4.
For the PROVer:
For all other machines:
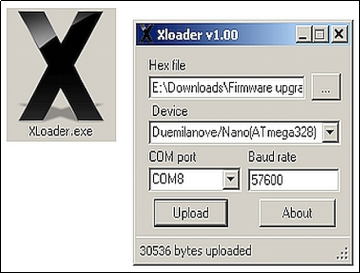
5. Using the File Manager, go to the location where you saved the “Firmware upgrade_1.1.zip” and unzip it. Inside the file that is created there is an executable program named XLoader. Double click on that program to start it and ignore any error messages that might pop up.
6. In the “Hex file” window, click on the hex file name that will be used to upgrade the version of GRBL in your controller. In the Device window, select Duemilanove/Nano(ATmega328). This is common for all controllers. In the “COM port” window enter the same COM port number as was recorded in step 3. If you are upgrading a non-PROVer controller, set the “Baud Rate” to 57600, which is the default when XLoader starts. If upgrading a PROVer controller, set the Baud Rate to 115200. Then click on the Upload button. When the version of GRBL has been uploaded to the controller, a message will be displayed showing the number of bytes uploaded. The value shown varies by the hex file used in the upgrade.
7. Start the Candle program and in the status window, verify that the version of GRBL shown matches the version used in step 6. That verification completes the controller upgrade process.