Fusion 360 Guide to Understanding Roughing & Finishing Passes

The items you may need:
- SainSmart Genmitsu CNC Router 3018-PRO DIY Kit
- SainSmart Genmitsu CNC Router 3018-PROVer Kit
- Download Fusion 360
- 1/8" 2 Flute Flat Nose End Mill
- 1/8" 2 Flute Ball Nose End Mill
Step 1: What is this, and why should you use this?
When someone starts using a CNC for the first time, there is a tendency to want to have the project finished as soon as possible. You’re excited after all, this is your maker moment, watching something of your own design take shape in front of you. Being so worked up, it would make sense to get your project to the finish line quickly, but what if you want more?

In traditional manufacturing environments the use of roughing, followed by finishing passes is a fairly common practice that ensures improve surface finish, dimensional accuracy and tolerance. The process is as follows:
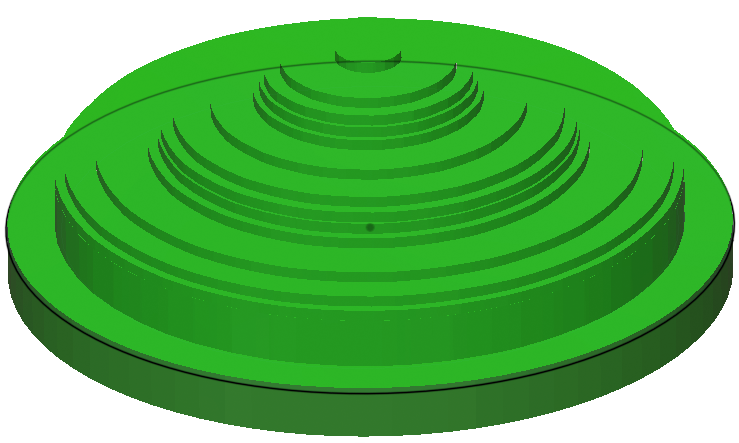
Roughing Pass: For this stage, a toolpath is created which removes as much excess material from the workpiece as quickly as possible, while intentionally leaving a sliver of excess material surrounding the model on all sides.
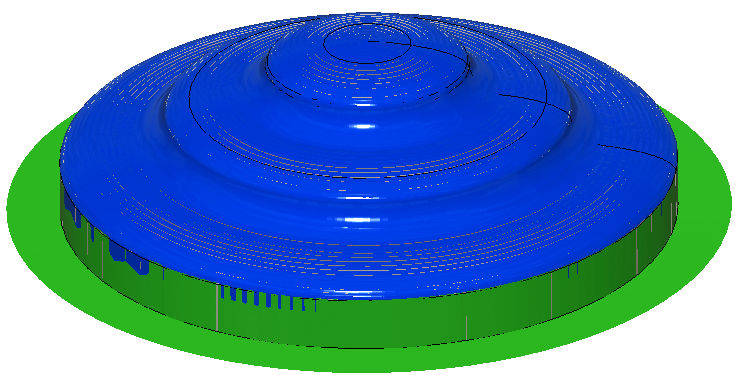
Finishing Pass: With very, very little material left over your final dimensions, there is less stress on your bit as it cuts; coupled with a slower feed rate and shallower cuts and you get a superior finished product at the cost of extra time.
Step 2: How to Set Up Roughing Passes
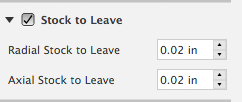
For roughing passes you want to use a pocket operation (2D or 3D depending on what your model looks like), adjusting your feed rates to be as deep and aggressive as your machine and materials allow. Beyond that the most important setting is to enable “Stock to Leave,” which will create that sliver of leftover material for the Finishing pass to chew through. You can find this setting in the “Passes” tab when you modify all of the other settings for your operation.
Settings to Consider in Your Roughing Passes:
- Stock to Leave: You want this enabled, it is what will create that sliver of leftover material for the Finishing pass to chew through. You can find this setting in the “Passes” tab when you modify all of the other settings for your operation.
- Manual Stepover - Maximum Stepover: Also in the “Passes” tab, this setting determines how much the bit is chewing through at one time. With some operations you can enter a number right away, but with a pocket operation you need to enable “Manual Stepover” before you can set the “Maximum Stepover.” For this, you should never enter a number greater than 90% of the diameter of the bit you are using; higher numbers mean a faster operation but a poorer finish.
- Feeds & Speeds: The Roughing Pass is all about cutting as much as you can as quickly as possible, so this means dialing up many of the settings in the “Tool” tab relative to your other settings. You can cut, relatively speaking, a quick and shallow path or a slower and deeper one, but no matter what you do, your settings should be significantly higher than what your set your Finishing Pass at.
- Maximum Roughing Step Down: Remaining in the “Passes” tab, this determines how deep your machine will cut per layer.
- Bit Selection Considerations: Generally speaking, use the biggest flat end mill that your machine can handle. While a ball end mill can be used for a roughing operation as well, this will add significantly more time due to the smaller required “Maximum Stepover.”
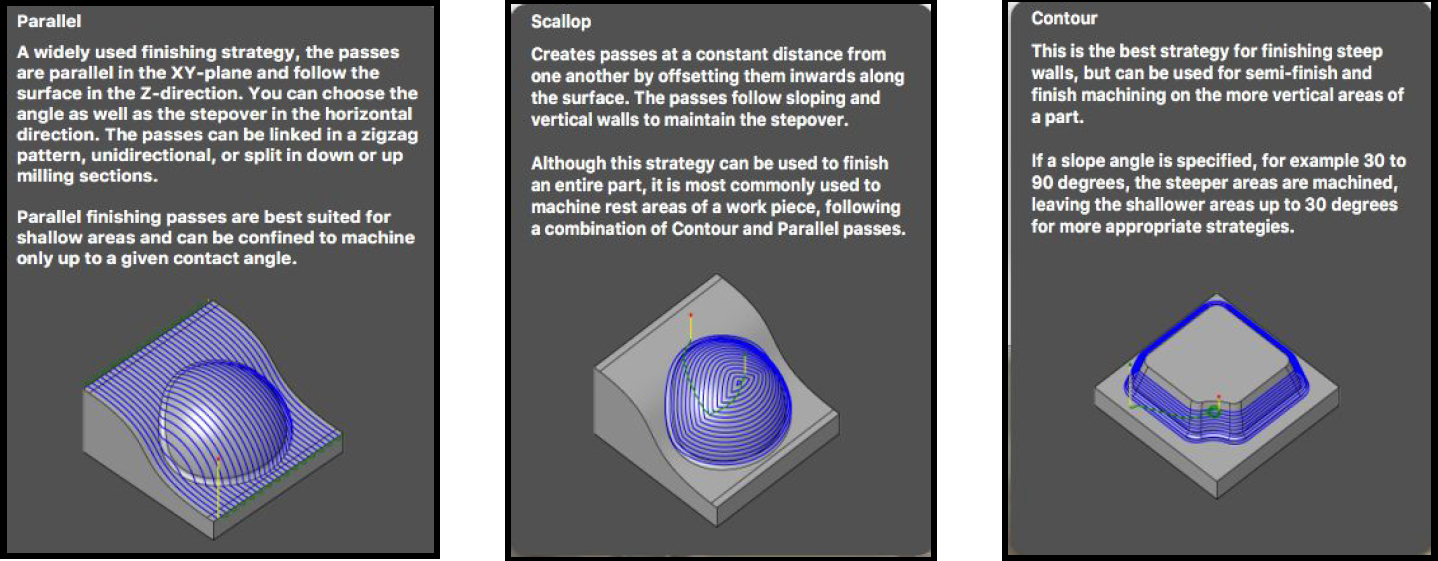
Step 3: How to Set Up a Finishing Pass
There are a lot of operations you can set up for your finishing pass, the easiest of which is that you do another Pocket Operation, or with 3D objects you can use Parallel, Scallop or Contour operations as well.
Settings to Consider in Your Finishing Pass:
- Stock to Leave: No matter what operation you decide to use, you want this disabled for the finishing pass.
- Manual Stepover / Maximum Stepover: For the finishing pass, you want this to be very, very low; as low as you have the patience for. This is especially important for any flat areas or vertical walls towards getting a nice finish and accurate final dimensions.
- Feeds & Speeds: Slower is better, but only to a point. What you want to avoid most of all during a Finishing Pass is “Bit Deflection.” This is when the machine puts so much pressure on your end mill that it bends or warps slightly. If you did your Roughing Passes correctly then there should be very little material for your machine to fight against, so you might as well go as fast as you can without harming the results.
- Bit Selection Considerations: You can, of course, use the exact same bit as with the Roughing Passes and there is still benefit to be had by doing things as described in this guide, but depending on the model you are machining, a ball nose end mill or a smaller sized end mill (for more, smaller details) might be appropriate.