How to Set Up & Use Candle for Multiple Operations
 Updated
So you’ve followed our Fusion 360 Guide to Roughing & Finishing Passes, have your tool paths made up and now might be asking yourself, what now? Well we are here to help! The general progression for creating something on your CNC is to go from modeling in CAD software to generating toolpaths in CAM software and from there you take the file to another piece of software that can send the toolpaths to your CNC. This guide will cover the latter, showing you how to take the roughing and finishing passes from the prior guide and putting them to practice.
The items you may need:
- SainSmart Genmitsu CNC Router 3018-PRO DIY Kit
- SainSmart Genmitsu CNC Router 3018-PROVer Kit
- Download Candle for Windows
- Download Candle for Mac
- Download video instructions & code for setting up the Z probe
1. Understanding The differences & Utility of Work Coordinates
CNC’s use a Cartesian coordinate system, where any location can be pinpointed with any combination of three numbers, representing the X, Y and Z axis. This is usually displayed as (X,Y,Z) with numbers substituted in depending on the location of the end mill.
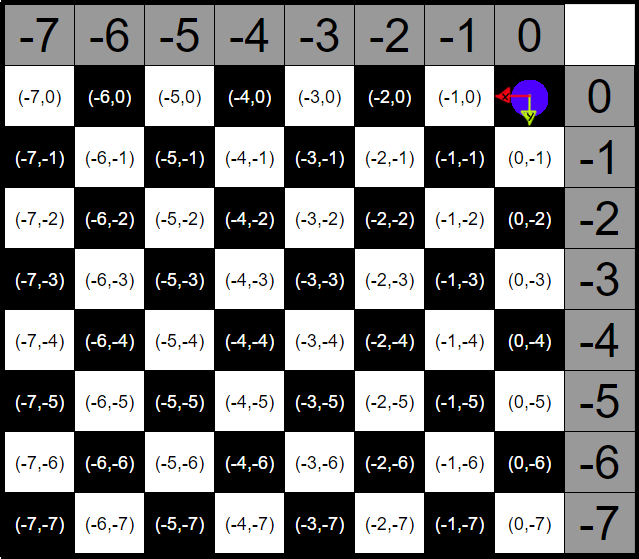
Homed Coordinate System
To help you visualize, the following image is a coordinate system visualized like you would see on a chess board. Movements to the left represent movement on the X axis, and movement down to the Y axis. The blue circle represents the Homing Location where it is traditionally located in the top right corner. If you have endstops, such as those that are standard on the PROver, then whenever you home, this is essentially a map of what your machine sees as the bed, only much, much bigger and with more precision. While there are some ways to use this, such as repeatable operations using jigs or clamps in a stationary location, largely this is not nearly as useful as the alternative we will use today.
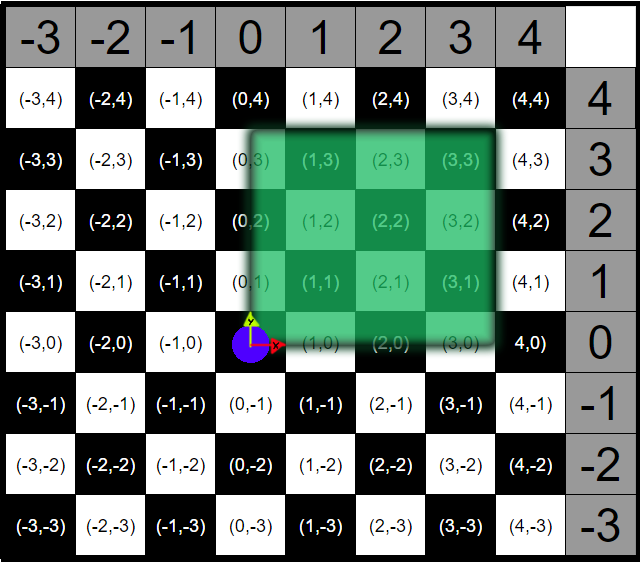
Work Coordinate System
The home location always stays the same, but the Work Origin can be set anywhere you want. In the illustration to the left, you see a depiction of the results of me moving my end mill from home to the bottom left corner of my stock material and “zero-out” my X and Y axis. (4,4) becomes (0,0) and the coordinate map changes to reflect that. Zeroing-out is usually one of the last things you do before telling your machine to start, and it is worth remembering as you go along that the CNC doesn’t forget this new Origin (0,0) until you set a new one yourself or power off the machine.
2. Putting Theory into Practice with Candle
Continuing with the project from the previous guide, we have a model with a lot of curves that, in order to machine it efficiently, requires two different bits: One 2-flute flat head end mill for the roughing passes, and a 2-flute ball nose end mill for the finishing pass. In preparation, you should have two seperate .nc files exported from fusion, named accordingly for each operation.
Setup & Roughing Pass
1.With your CNC powered on and plugged in, load up Candle (Download Here for windows, Here for Mac) and connect to your CNC if it does not do so automatically.
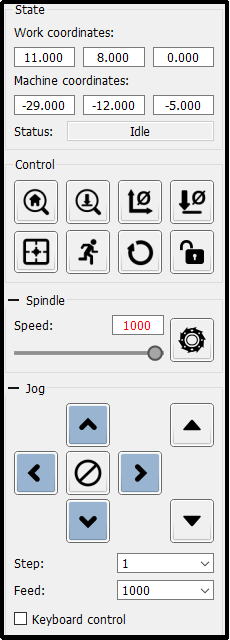
2.Secure your stock material to the bed and use the jog arrows (as seen to the below) to bring the center of the end mill directly over the bottom left corner on the X, Y Axis. Position it as best as you can and then press the  key to zero-out the X and Y Axis. You will see 2 out of 3 of the work coordinates turn to become 0.
3.Now you need to zero-out the Z axis in order to have your work coordinates completely set. There are two ways to do this:
- If you have the 3018 Pro, or another CNC that does not have a Z-Probe, then you will need a piece of scrap paper, the thinner the better but not crumpled (this is important). Bring the end mill close to, but not touching the material and set your steps in the Jog menu to “.1”. Taking a small torn off bit of paper, place it between the end mill and the stock material and use one hand to continually move the paper back and forth, while using the other hand to lower the Z axis until you feel the paper snagging against the end mill. At this point you can say it’s good enough, or further dial in the settings by bringing steps to “.01” and continuing to raise/lower the bit until satisfied. Once it is in position, select the button
 to zero out the Z axis.
 - If you have the PROver or have modified your 3018 Pro to allow for a Z-probe, simply set up the Z probe (download video instructions & code here), and place it between end mill and stock material, and press the button
 .
.
Finishing Pass
By using the work Coordinate system, you do yourself a lot of favors in regard to changing end mills for different operations. The machine remembers the new (0,0) you set earlier so you can safely (using the jog arrows in Candle) move the spindle away from the project to change out your end mill. Don’t worry about wherever you move it to, or moving it back for that matter. The CNC will do it for you when you start the finishing pass. All you have to do before starting is to zero-out the Z-axis again, just as you did in step 3.