How to Use Limit Switches to Maintain Positional Accuracy Between CNC Operations

Base Concept
The core element of this process is the use of the "Restore Origin" Button, highlighted in green below:
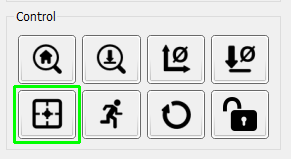
What this does is, regardless of homing or soft resets, is restore the X, Y and Z origin to the same numerical values as the last time you manually zeroed them out. In order to take advantage of this, and to use it to ensure positional accuracy between operations, it is important to utilize a point of reference starting from the beginning.
Steps to Follow
- Home the CNC
Homing prior to establishing your origin is very important, this means that if you jog to [-100,-50, -15] after homing, that the coordinates are in reference to the home position. This way, if you home again, change out your bit, and then jog to [-100,-50, -15] again, the location will be precisely the same as the first time you set your origin.
- Jog to Desired Origin Point
Selecting your origin is entirely arbitrary based on the needs of the project you are trying to create. The entire reason for this guide is for you to reliably get back to this origin after it has been locked in.
- Zero X/Y/Z Axis
This one is pretty self-explanatory. The only thing to take special attention to at this point is making sure that however you zero your Z axis, you do it the same way for future operations regardless of zeroing manually of with a Z probe.
- Run First Operation
- Change Bit as Needed
It is very important to change the bit before you home your CNC in step 6 and not after. The reason for this is that you have to exert considerable force on the CNC to loosen the collet and extract the bit and if yo do so after homing, you may find that you have accidentally moves one or more axis enough to misaligned the next operation.
- Home the CNC & Press Restore Origin
Upon doing this, you will find that your coordinates will show all negatives on the X, Y and Z axis. If you were to jog to make all coordinates equal to Zero, you would be right on your original Origin.
I bring this up because it serves useful in order accurately Zero the Z axis by doing so at the same exact point as last time you did so, as is needed. The easiest way to do this is to manually type jog values up to and including decimal points to get to the point quickly.
- Zero the Z Axis
Very Important: There is a nuance to the restore origin button that you must be aware of. For reasons beyond explanation the Z axis coordinate is not restored reliably, even with the same bit being used. It is better than nothing, but compared to the X and Y axis which are accurate up to around .01 -.02 mm the Z axis is considerably worse.
If you are confident that your bed is level and so is your stock material, then it doesn't matter if you zero the exact same position, but doing so is more often prudent and provides the best results.
- Run Second Operation
- Rinse and Repeat as Needed From Step 5 Onward
This process is repeatable through any number of bit changes with the only attention needed is really to the Z axis,