How to Install the ER11 Collet
 Updated
Things you may need
Genmitsu ER11 Precision Spring Collet Set
Genmitsu 4pcs ER11-A Collet Clamping Nut
Introduction
What the ER11 collet system is on your router and how to use it. This is very important to ensure your bit is mounted correctly. This is the ‘standard’ tool holder for small routers. ER is the ‘name’ 11 means that it has an 11 mm diameter at the bottom of the taper in the holder.
Why is a collet system is used, why not just mount a chuck which would be more versatile and easier to adjust? A Collet system will:
- Clamp the bit more firmly.
- Give a superior alignment of the bit within the holder.
The drawback is that the size of the collet used must be matched to the diameter of the bit shank, but different sized collets are relatively cheap.
It has 3 parts, Holder, Collet and Clamping nut:
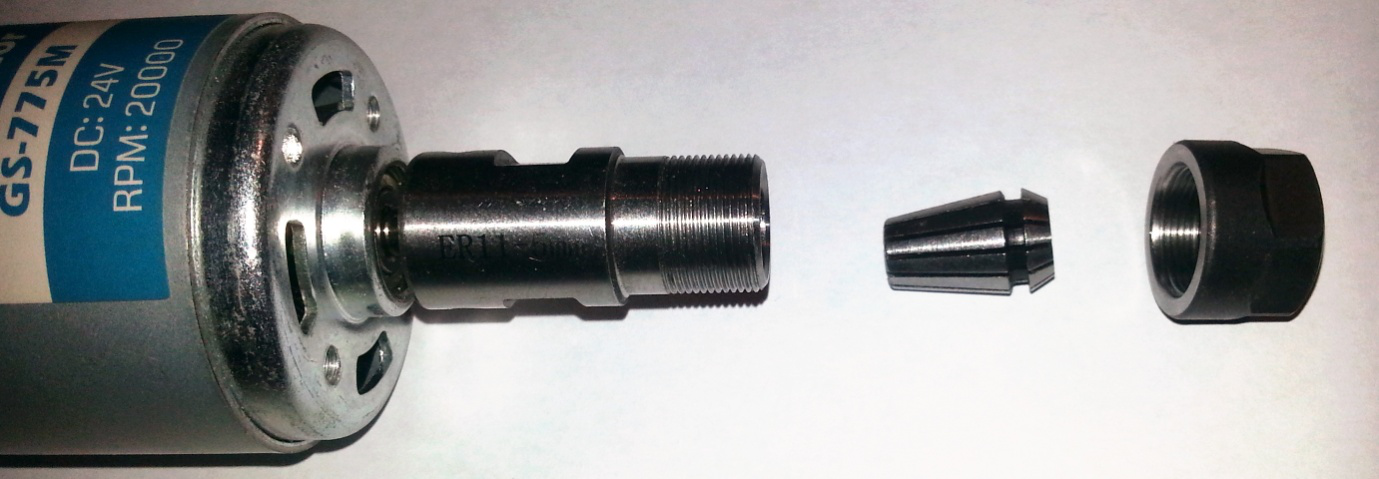
Holder
Normally factory fitted onto the motor shaft as it is a very tight or interference fit onto the shaft in order to keep it exactly aligned. It is further held by two grub screws tightened onto the motor shaft. It can be removed and replaced but will probably require heating to slacken the fit and the very careful application of force to avoid damaging the motor.
It has a tapered interior which matches the angle of the collet so that as the collet is forced into the holder the collet is compressed and clamps round the shank of the bit. A threaded area at the bottom to match the clamping nut and a couple of flats allowing a spanner to be used to tighten and release the collet.
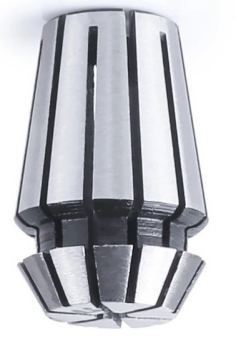
Collet
The Collet fits round the shank of the bit and slides into the tapered interior of the holder. Near the bottom is a groove which fits into the clamping nut and at the bottom another taper which matches the clamping nut. The slots cut through the collet allow the segments to be forced inwards round the bit as it is tightened into the holder. There is obviously a limit to how much it can be compressed meaning the hole through the collet must match the diameter of the shank of the bit.
Nut
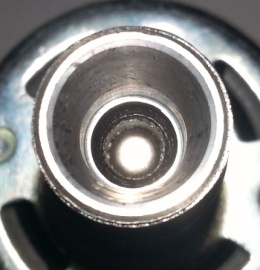
Not just a simple flanged nut, the design of the interior is important.
At the base there is a bottom taper, this matches the taper angle of the bottom of the collet and ensures as it is tightened the collet is compressed evenly.
Above this is a retaining ring, this is very deliberately made wider at one side than the other, it’s not supposed to be concentric to the nut. This retaining ring fits into the groove of the collet. This holds the collet into the nut and also when you wish to remove a bit it forces the collet down out of the taper of the holder breaking any ‘cold welding’ which may have occurred and so releases the clamping around the bit allowing it to be removed easily.
The simple reason that the retaining ring is offset within the nut is to allow a collet to be inserted and removed.
Collet Sizes
ER11 Collets are described by the internal diameter. So a 3mm collet is designed for a bit with a 3mm shank diameter. There is a bit of tolerance built in due to the clamping action so a 3mm collet will also take a 1/8 ” or 3.175mm shank. A 1/4” shank is 6.35mm so it’s closer to the tolerances but a 6mm or 7mm collet should work. Depending on the bits you use get the collets to fit them, if you frequently use 6mm bits then get a 6mm collet, if you often use 1/4” bits get a 1/4” collet, if you use both, get both.
Collets are also available in sets which can be cheaper and very useful if you also use drills.
Changing a collet
Removing a collet
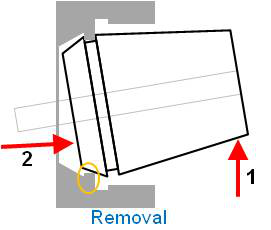
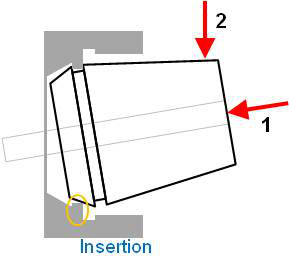
First remove any bit and unscrew the clamping nut completely from the holder. The collet now needs to be popped out of the retaining ring by pressing the collet over to the side (1) and then applying a push to pop it out (2).
It will depend on where the direction of the sideways push is. It will be easiest to push out when you are lifting the collet slot over the narrowest point of the retaining ring on the nut as shown by the orange circle. As you cannot see where this is if it doesn’t pop out at the first attempt rotate it a bit and try again.
Inserting a new collet
Before inserting a new collet make sure;
- The inside of the tool holder is clean and free from dust and debris.
- The collet itself is clean, on the outside of the tapers, in the spaces between the collet segments and in the bore which will take the bit.
- The nut is clean and free from debris around the retaining ring and on the bottom taper.
- Do not insert a collet into the nut with a bit inserted into the collet! This will limit the amount the segments of the collet can move and will make it nearly impossible to seat the collet into the nut correctly.
Locate the widest point of the retaining ring in the nut and engage the slot of the collet into it, while pushing it into the nut (1) press it straight (2), it will ‘clip’ in. After insertion check that the collet is straight and is fully seated into the nut.
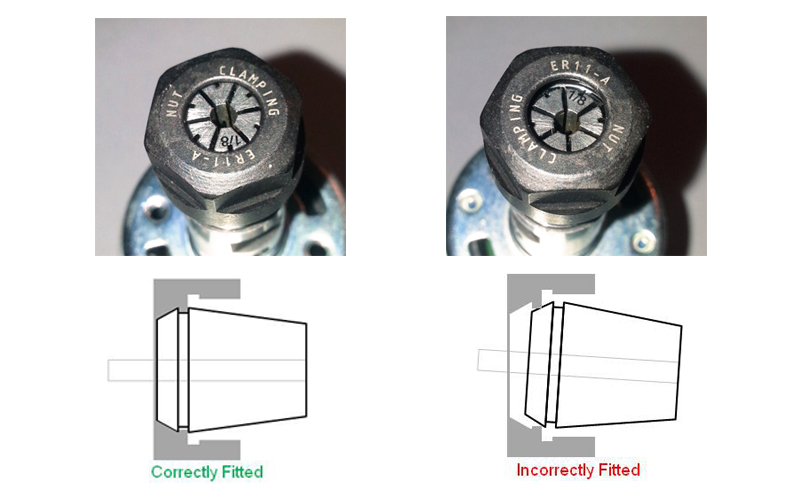
The left photo shows a correct alignment with the collet aligned with the nut and the bottom taper sitting on the corresponding part of the nut. On the right the collet is not aligned with the nut, the bottom taper is resting on the retaining ring rather than it being in the slot of the collet. When tightened from this position the collet will be forced out of alignment and damage to the nut, collet and tool holder could result.
For ease of use I have purchased an ER-11A clamping nut for each collet. This means I can just leave the collet permanantly in the nut.
Inserting a bit
- Make sure the nut is slack on the tool holder.
- Make sure the shank of the bit is clean.
- Slide the shank into the collet, the maximum depth of the bit the collet will clamp is 18mm (some collets may have a shorter clamping distance). There is a gap between the top of the collet in the tool holder so a bit can be inserted further if required.
- Using the spanners firmly tighten the nut onto the holder, compressing the collet around the bit. This does need to be tight.
Checking everything
After mounting a bit, especially after changing the collet, manually rotate it and ensure the rotation of the tip of the bit is straight and true.
If it is not check:
- The collet is seated correctly in the nut.
- A dirty bit shank or collet interior is not throwing things out of true
- The tool holder taper and collet exterior are clean
- The collet is the correct size for the bit shank
- The collet has been tightened enough and holds the bit securely
- The bit is not bent or damaged.
If excessive vibration occurs when the spindle is turning a process of elimination can identify the cause. Remove the nut, collet and bit from the holder and try again. If the vibration persists check that the holder is straight and secure on the motor shaft, if it still persists then the motor itself is the suspect.
Remove the bit from the collet and reattach the nut and collet into the holder and try again. If the vibration persists check the collet mounting into the nut. If it goes away check that the collet is the correct size for the bit shank or try a different bit.
NOTE: These checks should be made without performing any cutting. If excessive vibration occurs when cutting it is often due to over stressing the router with the depth of cut and/or feed rate being too high.