How to Install Candle/GRBLControl for Windows 8 or Later

Please Note
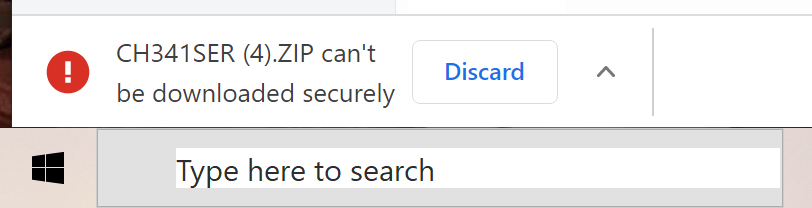
If you are using Google Chrome and have issues with download links, such as clicking the download link and nothing happens, you will need to right-click the download link and select "Save Link As" in order to download. Once you will do so, you can select where to save the file, but once you hit "Ok" you will see this appear:
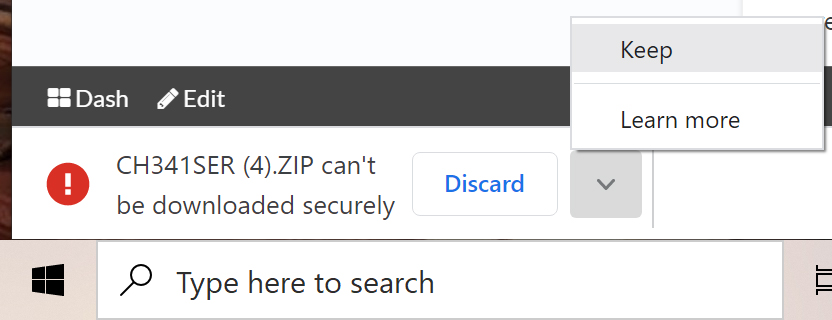
In order to proceed with the download, you will need to select the ^ arrow and select "Keep":
We apologize for the inconvenience that this may cause, but there is not anything we can do to resolve this problem.
Step 1: Driver Installation
All files referenced should be on your SD card or mini CD, if there are any problems with accessing these you can download a full copy of this from here.
The first step is to install the Windows Serial port driver, labeled CH341SER. If you cannot find this file, you can download it again from this link. Please note that the file linked is stored in a compressed .zip file. To use, you must extract the full contents of the .zip to a designated folder, and then try running the file from there. Running files from the .zip directly will not work.
Once you have found CH340SER.exe, right-click it and select "Run as administrator" and authorize the programs to make changes to your computer. From there, just follow the installation process and you are done with this step.
Step 2: Software "Installation"
This is a free and open-source program that talks to your CNC by a serial USB connection and provides a variety of functions.
Candle can also be downloaded on its own for Windows from this link, Please note that the file linked is stored in a compressed .zip file. To use, you must extract the full contents of the .zip to a designated folder, and then try running the file from there. Running files from the .zip directly will not work.
Once the file has been unzipped, you can place the folder which contains Candle on your Desktop or other location on the C: drive. We do not suggest running Candle off of a USB or removable drive as this causes errors.
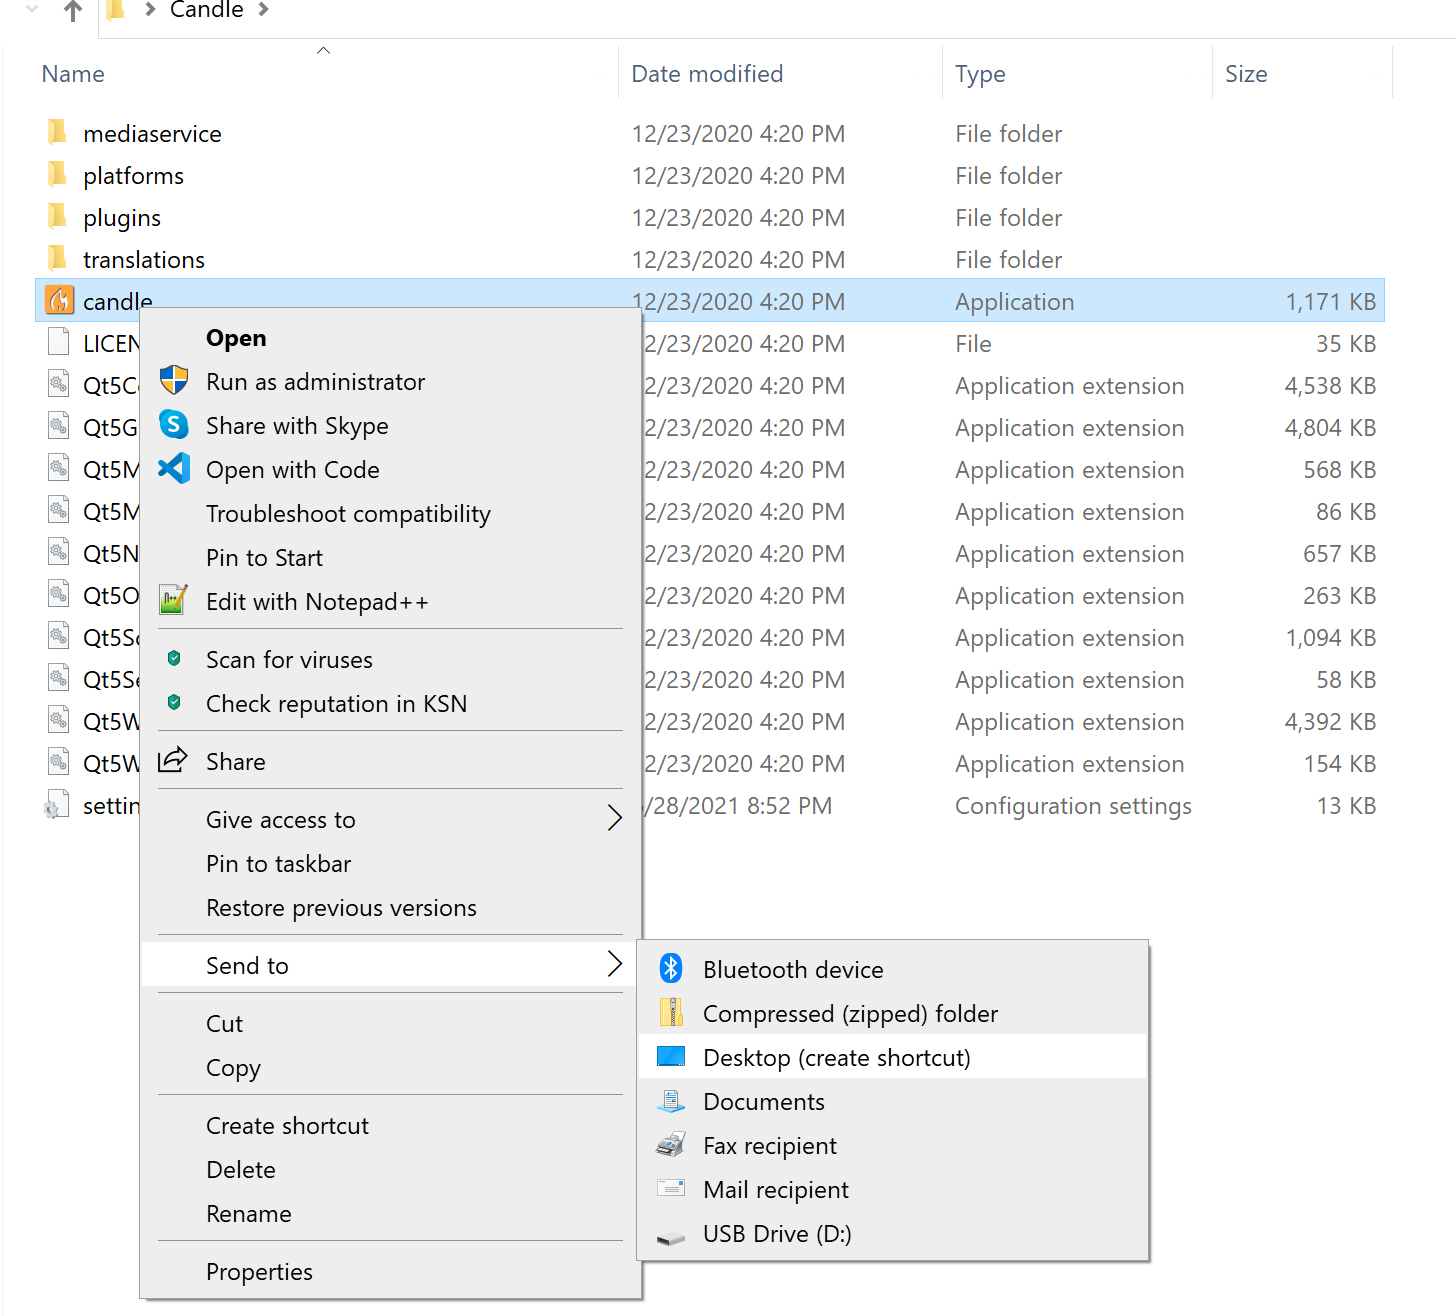
After you have placed the folder where you want it to be stored, open the folder and find the primary file, Candle.exe and create a shortcut to your desktop as shown below:
You can now use the shortcut from your desktop to start up Candle. No further installation is required.
Step 3: Connecting To Candle
Note: Before you get started, disconnect any offline controllers. Your CNC can only connect to one controller at a time.
With Candle loaded up you will want to check the status in your device window, this will help you understand if you have an active connection. See the instructions below for the status that you see upon first loading up Candle:
Status: Not Connected
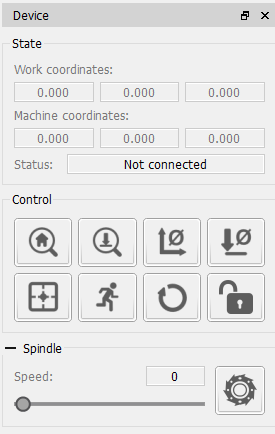
More often than not, "Not Connected" is what you should see when you open Candle for the first time. If this is the case, then Candle was unable to automatically find your router and you must manually configure it. Simply select the Service/Settings option from the top menu and you should see the settings menu:
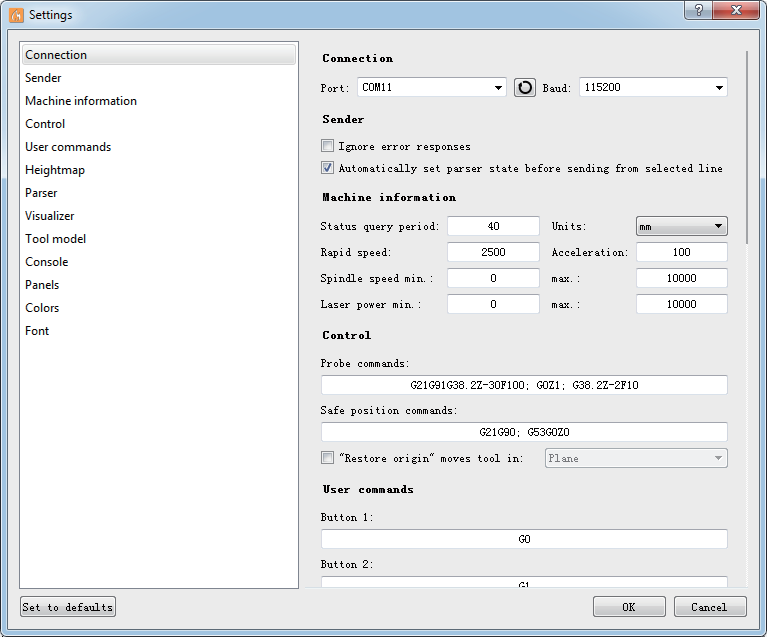
Check Your Baud Rate:
Start off by checking the Baud Rate. This is a constant, but varies depending on the model of CNC that you have:
3018-PRO and other PRO series CNC: The Baud Rate should usually be set to 115200 but some models use 57600.
3018-PROVer and other PROVer series CNC: The Baud Rate will always be 115200 for this model.
PROVerXL 4030 and other PROVerXL series CNC: The Baud Rate will always be 115200 for this model.
Find your Port:
With the baud rate set up correctly, we will next need to find the correct port for connecting your CNC. Ports are like unique, individual addresses for the various ports on your PC. Once you hit the little refresh button, only current active ports should be shown; the more stuff you have connected, the more you might see.
There are ways to figure out the exact port using the device manager, but to keep it simple (and since there are usually only 1 or 2 ports are listed) go ahead and select one from the dropdown menu.
In order to test if this is the correct port, you will need to select "OK" at the bottom of the settings menu and then check your CNC status and see if it has changed to "Idle", "Alarm" or "Port Opened". If you see any of those three you have the correct port selected and you can move on to addressing your new CNC status, but if you still see "Not Connected" then it is time to go back into settings and try the next port on the list.
If, after trying all the ports listed, you still see "Not Connected" as your status then please reach out to us at support@sainsmart.com for assistance with this issue.
Status: Alarm
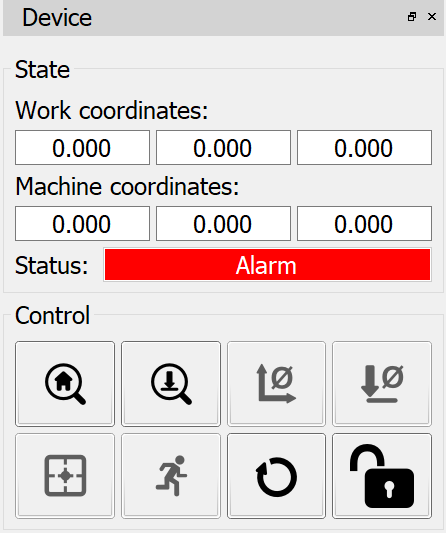
For a 3018-PROVer, PROVerXL 4030, or any GRBL-based CNC with limit switches, "Alarm" is the correct status to see with an active connection to your CNC.
The "Alarm" state is what the aformentioned CNC's default to every time you start up Candle, and is totally normal. What this state means is that until a Homing Cycle has been run the CNC will remain largely unresponsive as a safety measure.
So what you might be asking yourself, what is a homing cycle? This is a process where the CNC uses the limit switches installed on it to find the "Home" location where your CNC can reliably go at any time to orient itself. In order to home your CNC, all you need to do press the button with a house inside of a magnifying glass, and your CNC will start to move.
The home location varies depending on your CNC, see more on the homing process here, but once your CNC stops moving you should see the "Alarm" status change to "Idle" which means that your CNC is good to go.
Status: Idle
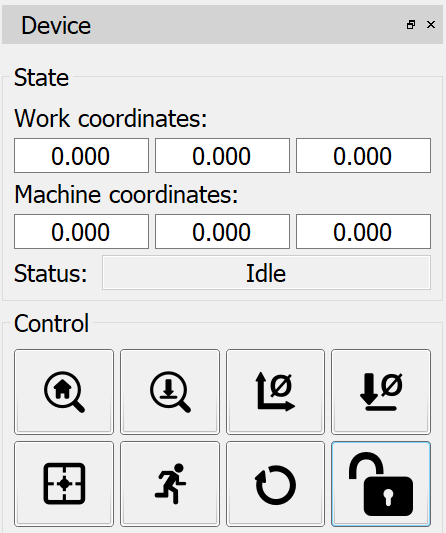
If you have a 3018-Pro CNC then you should never see the "Alarm" state and go straight to "Idle" after connecting. For any of our GRBL-based CNC's though, this is what you want to see before you load up your project and get cutting.
Status: Port Opened
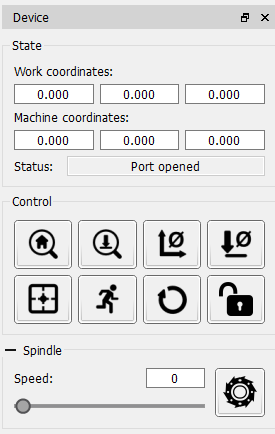
If you are seeing this status, then something has gone wrong. See the points below to troubleshoot:
- Make Sure your Offline Controller is Physically Disconnected from Your CNC: This is a very frequent cause for "Port Opened" as your CNC can not connect to more than one device at a time. Once you disconnect the offline controller, disconnect and re-connect your CNC to your computer if Candle doesn't refresh on its own.
- Check your Emergency Stop Switch (If You Have One): Not everyone realizes that the emergency stop switch locks into place when triggered, and it might be triggered out of the box if you accidentally pressed it in during assembly, so take a moment to turn it in the direction of the arrows on the button and see if it pops up.
- Make Sure that You are Not Running Other CNC Programs: As stated before, your CNC can only talk to one device at a time, but it is important to understand that this also includes other programs such as Easel, bCNC, Carbide Create, UGS, or even other copies of Candle. If any other program is connected to your CNC, Candle will show "Port Opened" until the prior connection is severed.
- Double-Check Your Baud Rate: If you accidentally have the wrong Baud Rate but have the correct port selected, you will see "Port Opened" as the CNC status.
- Hardware Failure: No one likes getting equipment that has something wrong with it, but despite our best efforts at quality control, it can happen; that's what our 1-year warranty is for. If you suspect this is the case after trying the above please reach out to us at support@sainsmart.com for further assistance, but in order to speed things up, here are some things we will likely have you check anyways:
- Try a different USB cable: Only one USB cable comes with your CNC, but if you have a conventional inkjet or laserjet printer, it uses the same type of cable as your CNC. If changing the cable out solves the problem, let us know and we can work on getting you a replacement.
- Try a different USB Port/Computer: Sometimes the computer itself is the problem, or a specific usb port on it. Between this test, and the prior USB cable test, we can pretty quickly conclude the issue is related to the CNC controller board itself.
Step 4: Configuring Candle
So now your CNC is connected, either with an "Idle" or "Alarm" status, before starting your first project, take a moment to go back into settings and check a few things.
Probe Command: The default probing code may look like it works when you press the probe button, but it is not configured correctly. Please see this guide on how to set up your Z Probe.
Rapid Speed should be set to 2000
Spindle Speed Min should be set to 0
Spindle Speed Max should be set to 10000 (or 20000 if you have the upgraded 20k RPM spindle)
And hit OK. Your software is now configured and ready for use.